EMMA Help Topics
Training videos are available on these topics:
- Single uploadA guide to creating an EMMA submission by supplying a file to upload and the information needed to make it findable and useful to other EMMA users.
- Bulk uploadAn introduction to creating and submitting bulk upload manifests, which allow you to upload multiple EMMA submissions at once.
Documentation is also available as downloadable PDFs covering these topics:
- Introduction to EMMA
- Enrollment and Account Creation
- Searching for Resources
- Depositing Remediated Resources
- A Guide to the EMMA Metadata
The PDF documentation has been updated for the beta release of EMMA as of April 22, 2024.
Signing in to EMMA
Searching EMMA may be performed by anyone, but downloading, uploading, and other operations that affect the state of EMMA will require you to identify yourself by signing in.
Sign in with Shibboleth
Pressing the button in the upper-right corner of the EMMA screen take you to a page of sign-in options. If your institution is a member of InCommon (or an identity federation affiliated with InCommon), you can use the Sign in with Shibboleth button to sign in to EMMA.
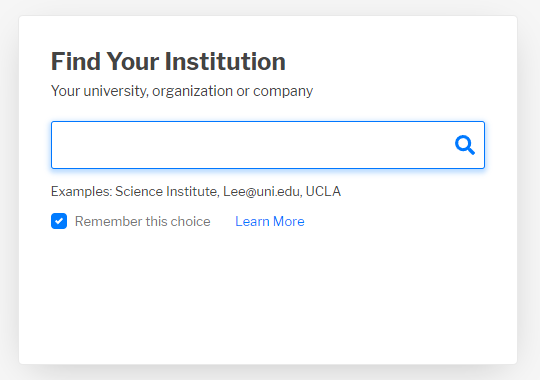
When you click on this button, EMMA redirects you to the InCommon page (above) which prompts you for your institution in order to redirect you to your institutional authentication provider.
After you complete your institutional sign-on, your institutional authentication provider redirects your browser back to the original EMMA page.
Local EMMA sign-in
If you have an EMMA account that is not tied to an institutional account, you can use the Local EMMA sign-in button to sign in to EMMA.

Clicking on this button presents fields for entering your EMMA account name and EMMA password. Fill these and click on the Sign in button on that same line to sign on with your local EMMA credentials.
If you have forgotten your EMMA password, click on Local password reset to generate an email which will allow you to reset your password.
Searching in EMMA
OVERVIEW
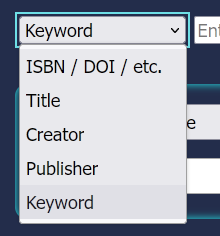
A search term is required to begin. You may search for matches on the basis of:
- Keyword
- Title
- Creator (e.g., Author)
- Identifier (e.g., ISBN)
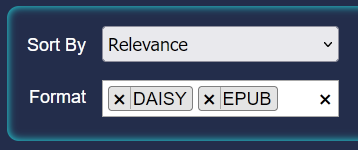
The Sort By default selection is Relevancy, and this should be appropriate for most searches.
The remaining filters are all optional:
- Repository: pick one, or default to all repositories
- Page Size: not currently implemented
- Format, Feature, and Accessibility: you may make multiple selections for each control. These will generate matches when ANY of the selected choices matches an item. Note that selections of filters tend to reduce the number of matches.
Search Types
Enter one or more search terms in the search input box, then press the button. (A search term can be a single word or phrase, title, identifier or author name.)
To clear the current search input, click on the "✖" that will appear on the right side of the search input box. This does not result in a new search — it simply clears characters that have been input to help begin a new search.
Keyword search is best for "discovery" of items that you hadn't considered before, but can lead to a large number of results — especially if you give only a single search term, or if your search terms contain many common words.
If you already know that you are looking for a title, or are looking for a specific ISBN, then you can help reduce the number of "false positive" matches by specifying the appropriate search input type.
Keyword Search
This search type looks for items matching your search term(s) across a combination of metadata fields (title, author, description, etc).
As a convenience, if a search term appears to be a standard identifier, your keyword search will automatically be converted to an identifier search.
Title Search
Find items whose title matches the search term(s).
For example, a Title search for "King" will return results with the word "King" somewhere in the title, but won't return items by Stephen King.
Creator Search
Find items whose author/creator matches the search term(s).
For example, a Creator search for "King" will return results by an author, editor or composer with "King" somewhere in their name, but won't return items that simply have "King" somewhere in the title.
Identifier Search
Find items whose ISBN, ISSN, OCLC, LCCN, DOI, or UPC matches the search term(s).
Just giving an identifier number alone should be sufficient — however, there are some cases (depending on the numbering scheme) where it may be necessary to prefix the identifier with its type:
Filters
The menu selections below the search input bar either filter out results that are not of interest or control the way that results are presented. (Press Less to reduce the number of filters shown; press More to see all filter selections.)
Filters (also known as "limiters") reduce the result set by eliminating all of the result items that don't meet the filter criteria. For example, setting "Repository" to "EMMA" discards all results from the current search except for items that originate from the EMMA repository.
Simple Filters
These are dropdown menus which can only be set to a single value.
Use this filter to limit results to just those from a specific partner repository.
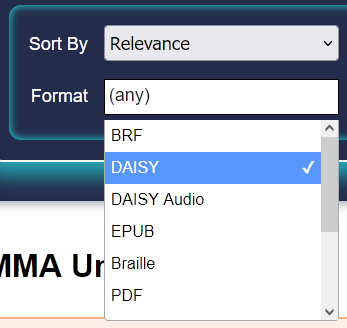
Multi-select Filters
These are dropdown menus which can be set to multiple values.
Click to drop down the menu selections, then click on a filter value to select it.
This has the immediate effect of eliminating all search results that don't meet the condition imposed by the selection.
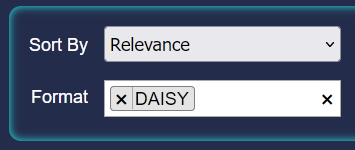
After the dropdown menu closes, your selection will appear as a marker with a leading "✖".
Click on the "✖" to remove the filter value. (This has the immediate effect of re-running the current search without that filter condition.)
Click in the area outside the marker to cause the menu to drop down again. Select a different filter value, and that will be added to the previous facet selection value.
This may cause some additional results to appear, because the multi-select facets use "inclusive-OR" logic — meaning that they allow through items that match at least one of the filter values.
To clear all facet selections, click on the "✖" on the right side of the menu control.
(multi-select)
Limit results to items that have at least one of the selected file formats.
(multi-select)
Limit results to items that have at least one of the selected remediation properties.
(multi-select)
Limit results to items that have at least one of the selected accessibility features.
Search Result Controls
The following menus do not limit the potential set of results you receive; they just control the order and presentation of results.
The default sort shows the result set in decreasing order of relevance, starting with the entries that most closely match the search terms.
NOTE: If search criteria are very broad, then alternate sort orders may bring items to the top that are only marginally useful. Selecting a sort order is most useful when items of a result set are highly correlated by fairly specific search criteria (search terms plus filter selections).
For "Results By File":
Select the number of results per page.
While some search terms may be so specific that the index can eliminate all
but the exactly right entry, more general terms may result in dozens (or
thousands) of results.
This filter gives you control over how large result sets are broken into
easier-to-handle chunks.
For "Results By Title":
This menu is disabled; the number of records acquired from the index is set
to the largest value that can be accommodated.
Search Display Modes
The search index underlying EMMA deals in low-level quantities that correspond to individual files (one entry for every copy of every format for a given title). The default EMMA search display mode takes these raw results and reshapes into a hierarchical view of title-level entries.
In this display mode, search results from the index are aggregated into a set of entries which represent creative works at the title level (as they would be seen at the originating repository. Each entry starts in a collapsed state; click the toggle control to expand it.
Each title-level entry begins with bibliographic metadata that applies to the creative work, followed by one or more collapsible sections. Each section starts in an expanded state; click the toggle control to collapse it.
Each section represents a format in which a copy of the creative work is available (EPUB, DAISY, etc.) and contains remediation metadata and other information which is specific to the file itself.
Some entries may have a more complex structure, comprised of multiple copies of multiple volumes. Each volume will be its own "subtree" with potentially multiple formats, and each format having potentially multiple copies (e.g., unique scans from different originators).
In this display mode there is a one-to-one correspondence between items returned by the index and the search result entries that are displayed on the page. All information for all (file-level) items are displayed fully expanded.
This mode might be useful if you are scanning for information that is not directly searchable by the index's defined search types. In this case, your browser's search-in-page facility can be used to find occurrences of the information directly on the page.
This mode may also be useful if you want search results in JSON format for
automated processing (by appending "&results=file&format=json"
to the URL).
Downloading from EMMA
Activation of item download links require you to be signed in to EMMA (although certain non-restricted items may be freely downloadable, depending on the originating partner repository). After performing a search, scroll to the item of interest, and click on the download link to initiate a download.
Downloading an ACE / Scholars Portal item
Because these items are made available to EMMA users via Internet Archive, see Downloading an Internet Archive item below.
Downloading an Internet Archive item

EMMA dynamically accesses Internet Archive to retrieve files from it. Depending on the item, the file may be immediately available, or it may require "on-the-fly" generation before Internet Archive can provide the file in the requested format.
If on-the-fly generation is required, expect a significant delay before the item has been prepared for download. (Internet Archive is actively working to make this process faster for their website, which will benefit downloads of IA items through EMMA as well.)
When it is ready, a button will appear. Click this to perform the actual file retrieval via your browser.
Due to the way that EMMA interacts with Internet Archive to retrieve protected content, it may seem as though nothing is happening after you click the button but the content is actually on its way to your browser via the EMMA server. (This behaviour should be addressed in the near future to make the download act like you would expect in your browser.)
Downloading an OpenAlex item

Any download link for an index entry associated with OpenAlex is actually a link to the original source of the file.
Downloading a University of Michigan Press item

The University of Michigan Press collection comes to us courtesy of Bibliovault. These items are delivered directly to the signed-in user from an internal EMMA collection server.
Downloading an item from a BiblioVault collection
The University of Michigan Press collection comes to us courtesy of Bibliovault. These items are delivered directly to the signed-in user from an internal EMMA collection server.
Downloading an EMMA item

Items that are "native" to the EMMA repository (that is, items that have been uploaded by EMMA users and/or are otherwise not to be found in any of the other partner repositories) are delivered directly from the EMMA repository to the signed-in user.
EMMA Download Events
List your downloads
This is a listing of your downloads in descending time order, starting with the one most recent.
List your organization's downloads
This is a listing of downloads by all users in your organization in descending time order, starting with the one most recent.
Uploading to EMMA
You must be signed in in order to submit a new remediated item, or to make changes to an existing repository entry.
OVERVIEW
All of EMMA’s functionality related to working with submissions is available after selecting Uploads from the navigation menu. The Uploads main page displays all of the files that have been previously uploaded to EMMA under your account.
Upload Actions menu
The available functions are displayed at the top of each
Uploads page as a set of buttons:

When you have completed remediation of a file and wish to share it with the EMMA community, this can be done by clicking the Create button. EMMA requires that you provide both the book’s content (a single file or multiple files contained within a single *.zip file) and metadata about the book that will benefit other EMMA users in determining if this volume will match their needs.
Action Short Cuts
Each item listed on the Uploads page is associated with controls to manage that item (to the left of the item details on desktop displays; at the top of the screen on mobile displays):
Clicking on will redirect your browser to a new screen that allows you to view the associated item. You may use your browser "back" button to return to this screen.
Clicking on will redirect your browser to a new screen that allows you to modify the associated item.
Clicking on will redirect your browser to a new screen that will prompt you to delete the associated item.
If your account is not authorized to perform a particular operation on an item, associated icon will not be displayed for that item.
List your past and current EMMA submissions
This is a listing of your completed and pending EMMA submissions.
Each entry in the list is preceded by action short-cuts for working with that entry.
List your organization's EMMA submissions
This is a listing of completed and pending EMMA submissions made by members of your organization.
Each entry in the list is preceded by action short-cuts for working with that entry.
Submitting a new item to EMMA
EMMA requires that you provide both the book’s content (a single file or multiple files contained within a single *.zip file) and metadata about the book that will benefit other EMMA users in determining if this volume will match their needs.
Step 1: Prepare a file for upload
Currently, remediated content must be submitted as a single file. If your content consists of multiple individual files, you will need to combine them into a single ZIP archive in order to submit them as a single EMMA entry.
Step 2: Select a file to upload
Press the button to open your browser's file dialog. Navigate to find the file on your workstation, and select it to begin the provisional upload of the file.
As this is occurring, an orange progress bar will appear just above the buttons. When file processed successfully, EMMA will display the file name.
(If the progress bar completes but no file name is listed, then a problem encountered in processing the file; please contact an EMMA administrator for help.)
This step gives EMMA an opportunity to verify the integrity of the file. For certain file formats, metadata may be discovered that will be used to "pre-populate" the submission form.
Step 3: Provide metadata
In order to make your remediation efforts findable in EMMA, information must be supplied to identify the source material and the nature of the file being uploaded. These include:
- Bibliographic metadata, such as Title, Creator (Author), Language, Format, and Type.
- Remediation data, which will help other EMMA users know whether the entire volume was remediated, specify which chapters were remediated, and/or indicate whether the volume was born accessible.
- Source Repository, where you will indicate the source of the original file that was remediated. This may include the EMMA repository itself, one of the partner repositories (ACE or Internet Archive), or one of the other choices in the dropdown list.
Metadata field filters
EMMA defines a significant number of metadata fields, so there are three radio buttons to provide different views of the data entered so far:
All Fields
The initial selection is unfiltered, showing form fields for all of the metadata types defined by EMMA.
Completed fields
Select this option to see only the fields that have been filled, either with data extracted from the file, or with values that have been entered manually.
This filter option also shows required fields that have not been supplied.
Incomplete Fields
Select this option to see only required fields that have not been supplied and/or optional fields which do not have acceptable values.
If this filter option shows no fields, then the entry should be ready to be submitted.
Step 4: Complete the submission
When all required fields have been supplied, and all fields with data are valid, then the button will be enabled. Press it to complete the submission.
If you decide that you do not want to submit the item, you may click (which will attempt to return you to the previous page), or simply go to any other page in EMMA.
EMMA-native versus partner repository submissions
"EMMA-native" submissions (where "EMMA" is selected as the "Source Repository") will be entered into the EMMA index immediately after completion. This means that your submission can start appearing in EMMA search results almost immediately.
The remediation of a file derived from the holdings of a partner repository must be submitted back to is submitted back to that repository for inclusion in their collection. Depending on the policy of the specific partner repository, there may be some delay (hours or days) before the new partner repository item associated with your submission starts to appear in EMMA search results.
Updating an existing EMMA entry
If you arrive at this page through the Upload Actions button, you will be presented with a dropdown menu of your previous submissions. Select an entry from the list to proceed.
The form for modifying an existing entry is very similar to the form for creating a new entry, except that the initial field filter is "Completed fields".
You may modify metadata associated with your submission by reviewing and modifying the metadata fields (refer to "Submitting a new item to EMMA" above for a description of how the fields are organized).
You may also replace the file that was originally submitted with a new file. To do this, select the button. Refer to "Select a file to upload" above for a description of the remainder of this process.
When the changes have been validated, the button will be enabled.
If you decide that you do not want to commit to the changes, you may click (which will attempt to return you to the previous page), or simply go to any other page in EMMA.
Removing an existing EMMA entry
If you arrive at this page through the Upload Actions button, you will be presented with a dropdown menu of your previous submissions. Select an entry from the list to proceed.
To verify that this is really the item you want to delete, you may click on More to display the item's metadata.
If you decide that you do not want to delete the item, you may click (which will attempt to return you to the previous page), or simply go to any other page in EMMA.
If you are certain that you want to delete the item, then click . This will remove the remediated content file and the associated entry from the EMMA Unified Index.
EMMA Bulk Upload Manifests
You must be signed in in order to create, modify, or submit bulk uploads.
OVERVIEW
The bulk upload feature, an alternative to the single-upload submission form, allows you to submit an unlimited number of items simultaneously. The information and requirements for each item to submit are no different, but the two-phase process supports workflows in which EMMA submissions can be more easily integrated into your organization's practices and accommodating your own schedule.
The first phase, creating and updating the manifest, supports the ability to assemble items for submission one at a time or in batches, in one sitting or in multiple sessions. In this phase the system validates your items as you enter them and will report on each item's readiness for submission.
The second phase, manifest submission, supports unattended operation after providing file location information. Submitting only pre-validated manifest items ensures that all submitted items have the potential to become valid EMMA entries.
All of EMMA’s functionality related to working with bulk upload manifests and bulk submissions is available after selecting Bulk Uploads from the navigation menu. The Bulk Uploads main page displays all of the manifests that have been previously created under your account.
Manifest Actions menu
The available functions are displayed at the top of each
Bulk Uploads page as a set of buttons:

When you want to begin the process of sharing a large number of files all at once with the EMMA community, this can be done by clicking the Create button. Once the item(s) have been gathered into a manifest, items which have been validated and saved can be submitted all together.
Action Short Cuts
Each manifest listed on the Bulk Uploads page is associated with controls to manage that manifest (to the left of the manifest description on desktop displays; at the top of the screen on mobile displays):
Clicking on will redirect your browser to a new screen that allows you to view the associated item. You may use your browser "back" button to return to this screen.
Clicking on will redirect your browser to a new screen that allows you to modify the associated item.
Clicking on will redirect your browser to a new screen that will prompt you to delete the associated item.
If your account is not authorized to perform a particular operation on an item, associated icon will not be displayed for that item.
List your bulk upload manifests
This is a listing of all EMMA bulk upload manifests you have created in descending time order, starting with the one most recently created or modified.
Each manifest in the list is preceded by action short-cuts for working with that manifest.
List your organization's bulk upload manifests
This is a listing of all EMMA bulk upload manifests created by members of your organization in descending time order, starting with the one most recently created or modified.
Each manifest in the list is preceded by action short-cuts for working with that manifest.
Creating a new bulk upload manifest
The interface for creating a new manifest is identical to modifying an existing manifest. Continue to "Working with bulk upload manifests" for help on adding and modifying manifest items.
Working with bulk upload manifests
A bulk submission manifest is a collection of items that can be submitted together to create multiple EMMA entries. A manifest is presented as an interactive grid with a row for each distinct remediated item to be submitted to EMMA and where each column represents a metadata field for that item (including a reference to the remediated file).
Manifest items can be provided in several ways:
Manifest title
When a manifest is started, a unique title is generated as a way to distinguish it from others you may have created. You can choose to keep this title or replace it clicking the Edit button next to it, which copies it into to an edit control where some or all of the characters can be replaced.


If you're satisfied, the Change button (or Enter key) will update the title; otherwise the Cancel button (or ESC key) will keep the title as it was. The title can be changed whenever you like. (Take care to provide a name that will let you distinguish it from other manifests you may have created.)
CSV file import
EMMA can fill manifest grid rows from the rows of an imported CSV ("comma-separated variable") file that has been exported from a spreadsheet (e.g. Microsoft Excel, or Google Sheets).
You can find detailed instructions for modifying an existing spreadsheet in the PDF Help document, “Depositing Remediated Resources” (available on the EMMA Help page). Alternatively, you can download this example Excel template file. (NOTE: updates may be released in the future.)
To begin, click the button which will open a "file chooser" for CSV files.
Once rows have been imported, any missing or problematic values need to be resolved manually in order to ensure that the new items have sufficient information to allow them to be automatically submitted.
Manual item creation
To create a new row at any point in the grid click the + (plus sign) and a new empty row will be inserted after that row.
Once your changes, additions, and deletions are as you like them, click the button to commit them. Uncommitted manifest items will be visible on the submission page, but they aren't eligible for submission.
Next Steps
After saving your manifest, you might be ready to submit the items it contains. In this case you may click the button on that page to submit that manifest. Once your changes, additions, and deletions are as you like them, click the button to commit them. Uncommitted manifest items will be visible on the submission page, but they aren't eligible for submission.
Updating a bulk upload manifest
If you arrive at this page through the Manifest Actions button, you will be presented with a dropdown menu of your manifests in descending time order, starting with the one most recently created or modified. Select a manifest from the list to proceed.
The interface for editing an existing manifest is identical to creating a new manifest. Continue to "Working with bulk upload manifests" for help on adding and modifying manifest items.
Removing a bulk upload manifest
If you arrive at this page through the Manifest Actions button, you will be presented with a dropdown menu of your manifests in descending time order, starting with the one most recently created or modified. Select a manifest from the list to proceed.
To verify that this is really the manifest you want to delete, you may click on More to display its details.
If you decide that you do not want to delete the manifest, you may click (which will attempt to return you to the previous page), or simply go to any other page in EMMA.
If you are certain that you want to delete the manifest, then click . This will remove the manifest and its contents from your list.
Submit a bulk upload manifest
If you arrive at this page through the Manifest Actions button, you will be presented with a dropdown menu of your manifests in descending time order, starting with the one most recently created or modified. Select a manifest from the list to proceed.
Bulk upload submissions

On the bulk submission page you will see a table with a row for each item that could be submitted and columns for each of the submission steps for that item.
Any submission step that an item has not yet progress through will show
 in the associated column.
Correct and Save Items
The Validation column is the first "step" of bulk submission,
and, generally, that step has already been performed in the creation of
the manifest itself.
Items that have been saved and validated will have  in
this column,
and these items are ready for the next submission step.
in
this column,
and these items are ready for the next submission step.
Items that have not yet been saved will have  in this
column.
Items that have been saved but are not valid will have
in this
column.
Items that have been saved but are not valid will have
 in this column.
Before these can be part of the submission,
return to the manifest (via the Edit button on the status),
make any changes required,
verify that items are correct,
and then save the manifest.
in this column.
Before these can be part of the submission,
return to the manifest (via the Edit button on the status),
make any changes required,
verify that items are correct,
and then save the manifest.
Identify Files
The File Status column is the next "step" of bulk submission.
In general, all items will initially display  in this
column, meaning that the name of the remediated content file given in the
manifest needs to be located.
in this
column, meaning that the name of the remediated content file given in the
manifest needs to be located.
Due to security constraints (enforced by all web browsers), files can only be accessed by explicit command of the user by way of the selection of file(s) through the native system's "file chooser". For the bulk submission page this is invoked by clicking the button.
Files are not uploaded at this point, only identified and given internal system "handles" that can be used to access the file for upload when the submission process is initiated.
The "file chooser" that is opened is "multi-select", meaning that you can specify more than one file before pressing "Open" to select them. To simplify the process, you can select "all files" (in whatever way your native system allows) and EMMA will locate all of the files whose names match manifest items. All other files will be ignored, so your remediated files can safely coexist with many other files in the same folder.
Because the automated submission process cannot begin without these file "handles" in place, the button is disabled all of the needed files have been supplied.
Identify items (optional)
If, for some reason, you would like to limit the set of items that will be part of the current bulk submission action, you can check the checkboxes of just those items.
If you want to exclude a few items, you can check the checkbox in the header to checkmark all items and then uncheck the items to exclude.
If you inadvertently have checked items and want to restore the default behavior you can click the checkbox in the header to toggle the state of all items' checkboxes until all are unchecked. When all items are checked, the header checkbox is checked; when all items are unchecked, the header checkbox is unchecked; if only some items have been checked, the header checkbox displays a dash (-) to indicate an intermediate state.
If no items are checked (which is the usual case), it is assumed that all eligible items should be included in the bulk submission.
Begin the bulk submission
Once file references have been resolved, click to begin the submission.
During or after the submission process you may click on the to see a text-based summary of submitted item successes (or failures).
At this point, the bulk submission interface does not require any interaction and will automatically process batches of manifest items through the remaining submission steps on their way to becoming EMMA entries.
File Uploading and Storage
There are actually two parts to this step, which is why you may see status values in the Storage Status column behave a little unexpectedly. The first part is handled by the EMMA client that runs in your web browser which performs the upload-to-cache part. The second part is managed by the EMMA server.
The first part is handled by the EMMA client that runs in your web browser which perform the actual "upload" in groups of five. As they are uploaded to cloud cache storage, their respective entry in the Storage Status column will change.
As files begin to arrive in cloud cache storage they will be "processed in" to be moved into permanent cloud storage, which is the second part of this step (handled by the EMMA server). Any entry whose file fails to be moved into permanent storage (possibly due to a network error or other transient problem) will not advance.
Indexing Status
Metadata for items are submitted to the "index ingest API" to create the index entry associated with that item. As they are transmitted to the index, their respective entry in the Indexing Status column will change. Any entry whose metadata is not accepted by the index (possibly due to a network error or other transient problem) will not advance.
Entry Status
EMMA repository entries are created for manifest items. As associated EMMA database items are created, their respective entry in the Entry Status column will change. Any manifest item that has made it through this last step is now associated with an EMMA repository entry which is findable in EMMA search.
EMMA Bibliographic Lookup Tool
Although the target application will generate these queries from fields in the submission form, this interface allows you to create that query manually and receive the results (in JSON format) that the target code would receive.
A query can be a simple identifier like "isbn:9780521454285", or it can a search including multiple search terms. Single identifier queries return the least ambiguous results. General searches may return many items that might not be what you had in mind. Caveat emptor.
Search Terms
A query can have multiple space-separated terms. Each term must be of the form prefix:value, where prefix is either:
- An identifier type: isbn, issn, oclc, lccn, or doi.
- A search type: author, title, or keyword.
If the search value has a space in it, it must be surrounded by quotation marks -- either double-quotes (") or single-quotes (').
As an example, all of the following are valid searches:
- isbn:9780385528863
- title:Shining
- author:"King,Stephen"
- author:"Stephen King"
- author:"King" title:"The Shining"
EMMA Account
You must be signed in in order to submit a new remediated item, or to make changes to an existing repository entry.
OVERVIEW
By selecting Users from the navigation menu you can get information about your account's details, an overview of submission activity, and a sub-menu with actions you may perform.
Account Actions menu
The available functions are displayed at the top of each
Users page as a set of buttons:

Action Short Cuts
Each item listed on the Users page is associated with controls to manage that item (to the left of the item details on desktop displays; at the top of the screen on mobile displays):
Clicking on will redirect your browser to a new screen that allows you to view the associated item. You may use your browser "back" button to return to this screen.
Clicking on will redirect your browser to a new screen that allows you to modify the associated item.
Clicking on will redirect your browser to a new screen that will prompt you to delete the associated item.
If your account is not authorized to perform a particular action on an item, the associated icon will not be displayed for that item.
View details of your EMMA user account
This page shows the properties of your EMMA account and system information about account activity, including a listing of your EMMA submissions, and a listing of bulk upload submission manifests.
Items in each list are preceded by action short-cuts for working with that item.
Updating your EMMA user account
This is a form that allows you to update your EMMA user account information.
If this field is not given Account ID is assumed to be the email address.
(NOTE: This feature is not yet implemented.)
List your organization's EMMA user accounts
This is a listing of every user account associated with your EMMA member organization.
Each user in the list is preceded by action short-cuts for working with that EMMA user account.
Updating an existing EMMA user account
Because of your privileged account, you have the ability to make corrections or additions to other accounts in your EMMA member organization.
If this field is not given Account ID is assumed to be the email address.
(NOTE: This feature is not yet implemented.)
EMMA Member Organization
You must be signed in in order to view EMMA member organizations.
OVERVIEW
By selecting Organization from the navigation menu you can get information about your organization's details and an overview of its members' EMMA submissions.
Action Short Cuts
Each item listed on the Organization page is associated with controls to manage that item (to the left of the item details on desktop displays; at the top of the screen on mobile displays):
Clicking on will redirect your browser to a new screen that allows you to view the associated item. You may use your browser "back" button to return to this screen.
Clicking on will redirect your browser to a new screen that allows you to modify the associated item.
Clicking on will redirect your browser to a new screen that will prompt you to delete the associated item.
If your account is not authorized to perform a particular operation on an item, associated icon will not be displayed for that item.
View details of your EMMA member organization
This is a listing of your EMMA member organization.
Each entry in the list is preceded by action short-cuts for working with that entry.
EMMA Enrollment Requests
To enroll for an EMMA membership, we need some basic information about your organization and yourself so that we can contact you.
When your enrollment is finalized, information about yourself will be used to establish you with the Manager role for a new EMMA Organization. As a Manager, you will be able to add additional users from your institution to operate as EMMA member users.
This form contains fields to prompt for information needed to start an EMMA membership. Required fields must be supplied in order to activate the Submit button. Other fields are optional.
EMMA Downloads
OVERVIEW
This page displays current and total summaries for items downloaded through EMMA from various sources, with subtotals for the various format types.
Each section has two parts. The first part shows recent downloads in that category which have occurred in the last 30 days, in descending order of download count. The second part shows all-time downloads in alphabetical order. (This will be the only section shown if there have been no recent downloads.)
In each table, the row header is also a link which leads to a detailed listing of the individual download events included in the row's total. (Use the browser back button to return to this About page.)
Users with the Administrator role are not included in download statistics on the production EMMA system.
By Organization
These tables show downloads from all EMMA users gathered into their respective organizations.
Clicking on an organization name leads to a detailed listing of the individual download events included in the total for that organization. (Use the browser back button to return to this About page.)
Because users with the Administrator role do not have an organization, downloads by administrators will not show up in either of these tables.
By Source
These tables show downloads from each EMMA repository source.
Clicking on a source name leads to a detailed listing of the individual download events included in the total for that source. (Use the browser back button to return to this About page.)
By Publisher
These tables show downloads for each publisher as indicated by the EMMA index record for the creative work associated with the downloaded file.
Clicking on a publisher name leads to a detailed listing of the individual download events included in the total for that publisher. (Use the browser back button to return to this About page.)
Note that not all items were supplied to their respective sources with a publisher name given. Any such items are aggregated under "(NONE)".